| Panel | ||||||
|---|---|---|---|---|---|---|
| ||||||
We will create a very simple system composed of a virtual button pressed periodically and a monitor which will display the state of the button in the Spinalcore admin interface and in the terminal. System architecture:
The best way to use this tutorial is to follow each step as it happens, no code or step needed to make this example application has been left out, so you can literally follow along step by step. A the end of each section, we show the current system architecture. |

| Panel | ||
|---|---|---|
| ||
For this tutorial, you just need the basic requirements |
| Panel | |||||||||||||||||||||||||||||||
|---|---|---|---|---|---|---|---|---|---|---|---|---|---|---|---|---|---|---|---|---|---|---|---|---|---|---|---|---|---|---|---|
| |||||||||||||||||||||||||||||||
The first step is to create the project's directory. We will call it button-system. Then, install inside the “spinal-system-basic” template. We suggest that before running the following command you initialize an npm project (with npm init): Install spinal-system-basic
Launch spinal-systemThat’s it. You have everything you need. You can check that everything is working by running the PM2 process file automatically generated:
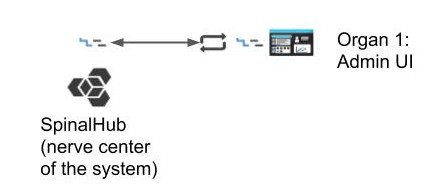
PM2 will automatically start the Spinal Hub and the organs. After this installation, only SpinalHub is running on port 7777. SpinalHub contains a web server that provide his own Admin interface (spinal-browser-admin organ). Here is the architecture of the system you have after this first install:
Connect to Admin UIThe admin interface is a browser application. You need to access it via a browser. We suggest you use google chrome. (you may change the host/port and the password corresponding to your .config.json file): http://127.0.0.1:7777/html/admin The default admin account is :
Admin interface views:
If you access the previous interface, then your system is running ! and you have access to the first organ (service) of your brand new spinal-system: its administration interface. Now let’s create our first synchronized data model and our first organ. Button-system Folder organizationYour button-system folder has been initialized with many folders and files that respect a spinal-system organization (see Framework & Best practices for more information). Apart from the node_modules folder which contains Node.js dependencies and the pm2 process file launch.config.js, a directory called nerve-center is generated which contains the database that will be stored and synchronized by using the Spinal System. Spinalcom-system architecture:
|


| Panel | ||||||||||||||||||||||
|---|---|---|---|---|---|---|---|---|---|---|---|---|---|---|---|---|---|---|---|---|---|---|
| ||||||||||||||||||||||
In the development of a Spinal System, one of the mains steps is to define the structure of the data (model) that will be synchronized. We are going to define this model in a specific library. In this quick start, we will create the model of a virtual button with a state attribute. The “virtualButton” organ will then modify the state of the model and we will monitor this state in the admin interface. Create a folder named spinal-model-button at the root of your project and, inside it, create a file called model.js.
spinal-model-button/model.js
When creating a model, there are 2 things to take into account:
The model of the virtual button is now defined and contains its state (on/off) in an boolean attribute called pressed. |
| Panel | ||||||||||||||||||||||||
|---|---|---|---|---|---|---|---|---|---|---|---|---|---|---|---|---|---|---|---|---|---|---|---|---|
| ||||||||||||||||||||||||
Now that we have our button model, we need to control its state by modifying its attribute “pressed”. To do this, we create an organ that interacts with the model. Make a new folder called virtualButtonOrgan where we are going to define our process.
An organ has to be linked with the Spinalhub via a connector. For this tutorial, we use the Node.js connector, which has already been installed at the first step. Inside the organ folder, create the file called index.js with the code below. virtualButtonOrgan/index.js
These are the steps that the code is following:
The current system folder organization so far is:
|

| Panel | |||||||||||||
|---|---|---|---|---|---|---|---|---|---|---|---|---|---|
| |||||||||||||
Run your organRun your organ with node:
We should have the following system running by now:
Results: Monitor the value in the admin UINow we will check if everything is fine. Let’s open the admin dashboard and see modification in real time. We see the file “mybutton”, to access to the real time value, check db inspector. |


| Panel | |||||||||||||||||||||||||||||
|---|---|---|---|---|---|---|---|---|---|---|---|---|---|---|---|---|---|---|---|---|---|---|---|---|---|---|---|---|---|
| |||||||||||||||||||||||||||||
Now that our virtual button works, we are going to create a monitoring organ that subscribe to the virtualButton data and display its state in real time in the terminal. Make a new folder called virtualButtonMonitorOrgan where we are going to define our process.
We will use the Node.js connector in the same way then we did before in the file index.js virtualButtonMonitorOrgan/index.js
These are the steps that the code is following:
The current system folder organization so far is: Run your organWe assume that all your precedent organs are still running. Run your monitoring organ with node:
We should have the following system running by now:
Results |

Conclusion
This first tutorial showed you three things :
- how to install & launch a basic spinal system
- how to create and store your own synchronized data model
- how to store subscribe, monitor and assign events to modification of one data
This tutorial will be continued in Basic Equipment Tutorial.